

I have been itching to try my hand at making choux pastry ever since I watched Martha Stewart teach Lindsay Lohan on her show. It was a queer episode, to say the least – The Domestic Goddess imparting baking tips to The Party Animal. What the …? Anyhow, it didn’t matter what they talked about, it was the profiteroles which were the reason why I watched on. Like, holy yum!
I have always had a love affair with all things made of choux – cream puffs, profiteroles, eclairs … you name it. I figured if I could learn to make choux pastry myself, I would never have to go to Beard Papa ever again. Which means lots of $aving$ because my cream puff cravings come quite so often. I just love the sight of choux puffs, don’t you? They are so pretty!
Don’t be deceived by their dainty looks, though. To make choux pastry, you need loads of arm power. Thankfully I am not lacking in that department, thanks to swimming and also from carrying my kids. Haha! The pastry needs to be stirred vigorously, non-stop … until you achieve a thick, creamy consistency, not unlike good quality mayonnaise.
I made my creme patissiere a day earlier and left it in the fridge, as I just didn’t want to do too many things at the same time. Speaking of creme patissiere, I reduced the amount of corn flour in myrecipe by a smidgen and it worked out beautifully! I actually took a moment to admire the final result – smooth and silky, and looking like it had just crossed the threshold of liquid to solid. It was a gamble reducing the flour, but baby, if it ain’t dangerous, it ain’t fun ;P
So back to the choux. You need to get all the ingredients measured out and ready to go, cos once you start, it’s rock n roll all the way. Stir! Pour in the flour! Stir! Pour in the egg! Stir! Pour in the next egg! Stir! You get the drift.
It is best to pipe the choux mixture onto a lined baking tray when it is still warm, to help them rise better. I didn’t have a piping bag, so I improvised with a regular, clean plastic bag (those transparent type). Just scoop all the choux mixture into the bag, tie it up tightly and snip off a corner. Tadah! A piping bag!
I piped my puffs petite, small enough to pop them whole. Remember, choux puffs are fussy lil divas. You bake them, then you need to give them their space and time to cool off slowly, with the oven door slightly ajar. It takes an extra hour or so after baking, for them to be ready for filling (real prima donnas, I tell ya). Cool too quickly and they will collapse. So, indulge them. For when they are ready, they will indulge you. That, I promise you.
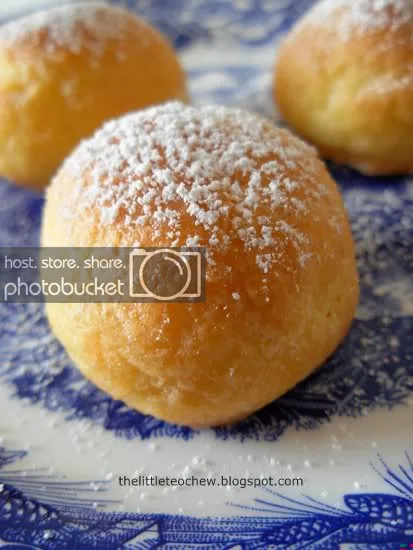
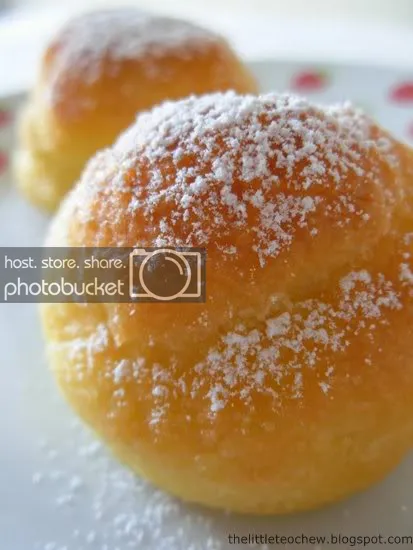
After filling up the choux with creme patissiere, I chilled them again for 20mins because cream puffs taste blah if they are not cold. Just dust some icing sugar lightly before serving.
And believe you me, they were so, so good! Yes, a visual sight to behold, but more importantly, light, airy puffs filled with cold, smooth, sweet custard that glides effortlessly down your throat … pure ambrosia.
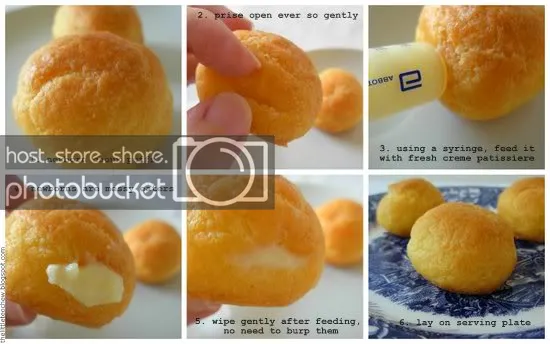
After placing the Cream Puffs on your serving plate, chill them. When ready to serve, dust with icing sugar. Notice the puff does not look as nice as the ones on the first photo? That’s because these were piped in a regular ball, as opposed to a swirl. Swirling gives the puffs a prettier shape.
Recipe
(adapted fromhere)
– 1 cup water
– 55g unsalted butter
– 1/2 teaspoon salt
– 120g plain flour
– 3 large eggs + 1 large egg (beaten lightly)
1. Place the water, butter and salt in a heavy saucepan. Bring to a boil. When the butter is completely melted, remove from the heat and add the flour all at once.
2. Mix rapidly with a spatula until fully combined.
3. Place the mixture on the stove over a low heat and dry mix for about 5-6 mins. The dough should be soft and but not sticky. If there is a thin white crust at the bottom of the pan, it means the dough is sufficiently dried.
4. Transfer to a bowl and spread to cool. Let the dough cool slightly.
5. Add the 3 eggs one at a time, incorporating each fully before adding the next.
6. Add the last egg a little at the time to control consistency. You do not want a mixture that is too runny, else the choux puff will not hold its shape. If the mixture looks right to you, stop adding the egg. The dough should be smooth, shiny and as thick and heavy as mayonnaise.
7. Preheat oven to 190 degree celsius. Cover a large baking tray with parchment paper. Fill a pastry bag with the dough. I used a regular clean plastic bag.
8. Pipe the dough into small balls about 2 to 3 cm in size. I find the puffs look nicer when the piping is done in a ‘swirl’, as opposed to a neat round ball. If your swirls have ‘peaks’, press them down gently with your finger (dipped in water). Otherwise, the peaks will burn as they bake. As Martha said (of the peaks), “Not acceptable!”
9. Brush the top with the egg wash (I saved a little bit of egg and mixed with water).
10. Bake for about 35 minutes or until well puffed and golden. Shut off the heat, leave the oven door slighlt ajar, and let the puffs cool slowly for about 1 hour. The puffs may collapse if they are cooled too fast.


![High Fiber Maca Cinnamon Flax Pancakes [Grain Free]](https://cookinggoals.com/wp-content/uploads/2020/01/IMG_7266-300x300.jpg)

