

Roast chicken was the reason why I bought an oven in the first place. It was in 2006, I think, when I bought this tiny 21L Tefal oven. My first oven! I wanted to cook more oven-roasted meals to save time and energy (washing up). But oftentimes, I would see it sitting idle, and I would try baking cakes and cookies to maximise its usage. That’s how I started baking. But that’s another story for another day.
Anyway, my sister came over during the weekend to see my kids. I made oven-roasted chicken, one of her favourite dishes. For the longest time, I have been roasting chicken using only salt and (stuffed with) garlic. See the recipehere. It’s delicious, but experience has emboldened me, and I’ve since tweaked this trusty recipe to seek new flavours.
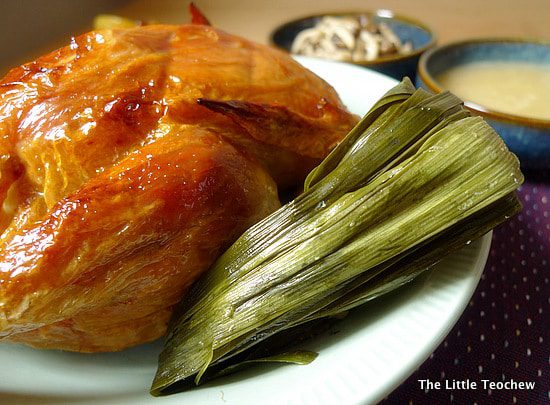
Once, when I had an abundance of pandan leaves leftover from a failed baking project, I used them as stuffing for the chicken. Two huge bunches, stuffed into the cavity and sealed shut with a toothpick. The aroma was out of this world. The best moment was when the roasting was done and it was time to undo the toothpick. As I removed the leaves, the sudden release of intense, intoxicating pandan just hit me … sweet-scented, swirling, spirally, steaming … incredible.
That’s what I made today – Pandan Roasted Chicken. You do need a lot of leaves, though. Make sure you stuff in as many leaves as you possibly can, for they soften and wilt during cooking. Salt the chicken (1 level tbsp salt) and you’re good to go.
One thing that I discovered was that you don’t need to pat the chicken dry prior to baking. I always thought this was a crucial step in getting crispy skin. It’s not.
Initially, I would diligently pat and pat dry using serviette after serviette. I felt this was terribly environmentally unfriendly. So, I switched to air drying (like making cured hams) before roasting.
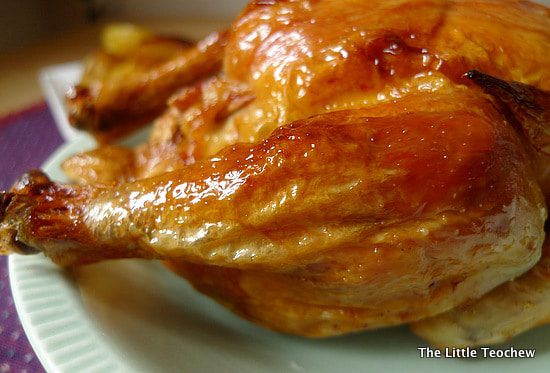
One day, I decided enough was enough, and I should see if I could get the same results without all this drying. If it was marginally less crispy, heck, I could live with it. Surprise, surprise! It was no different than before. Crispy on the outside, juicy on the inside. So, ditch the paper serviettes, ditch the drying, save the trees! You heard it from me first. 🙂 Don’t let anyone tell you otherwise.
Since then, I have always roasted chicken without any fuss. And I still get a golden crackling crisp, as you can see from these photos.
My sister never fails to say this whenever she eats my oven-roasted chicken, “I don’t know how you get the skin to be so crispy!” Always! LOL. Well, now you know … there’s no secret!
Recipe
For the chicken
– Preheat the oven to 240 degree celsius (I heat to 260 for my cranky oven)
– Wash the chicken, set aside.
– Wash pandan leaves and bundle them. Stuff as many as you can into the cavity of the chicken.
– Seal with a toothpick.
– Rub the entire chicken using 1 level tbsp of salt.
– Place it breast side up on a lightly oiled tray (I use 2 drops of oil and rub all over the surface). It prevents sticking since I don’t use teflon.
– Roast for about 1 hour.
– If your oven does not have a rotisserie function like mine, you have to turn the bird the other side up to get even browning both sides. I do this 6-8 mins before the timer goes off, just for the skin on the underside to brown.
– Take the bird out of the oven and allow it to rest, for the juices to redistribute – about 15mins.
For the gravy
– Through a sieve, pour whatever juices and oils collected from roasting into a saucepan. This will remove the charred bits.
– Add some flour to it (about 2 tsps or more if you want it thicker) and whisk everything into a roux. Let the roux bubble for about 15 seconds just to get rid of the flour-y taste.
– Add some chicken stock and bring everything to a boil, till the gravy thickens. Sometimes I add cream, if I have it.
– Optional: add a dash of sherry or cognac.
– Ready to serve!
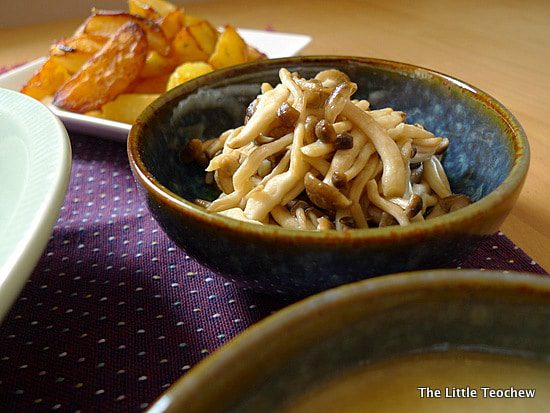
Pan-roasted Brastagi potatoes, sautéed Buna Shimeji mushrooms and gravy.
I made a side serving of roasted potatoes and Buna Shimeji mushrooms. Everything was cleaned out. 🙂 I’m glad everyone enjoyed their Sunday brunch.


